
Let’s review how to we get Felix a 3D printed quadruped robot to walk. Start by downloading or cloning the code from GitHub (https://github.com/Traverso/Felix3D).
If you haven’t done it yet, get Node.js and install/setup Johnny-Five to communicate with your microcontroller/board.
Getting Felix to walk properly requires some tweaking. We will try to compensate in software for a number of small imperfections in hardware that eventually add up.
You have (or should had) already done a rough calibration of the servos and leg assembly. Now let’s test one leg at a time.
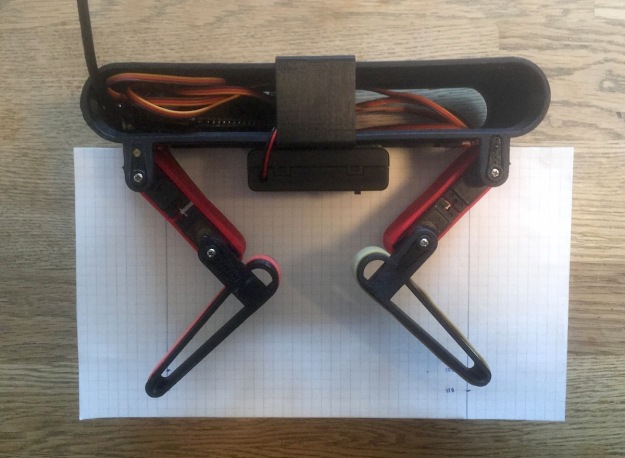
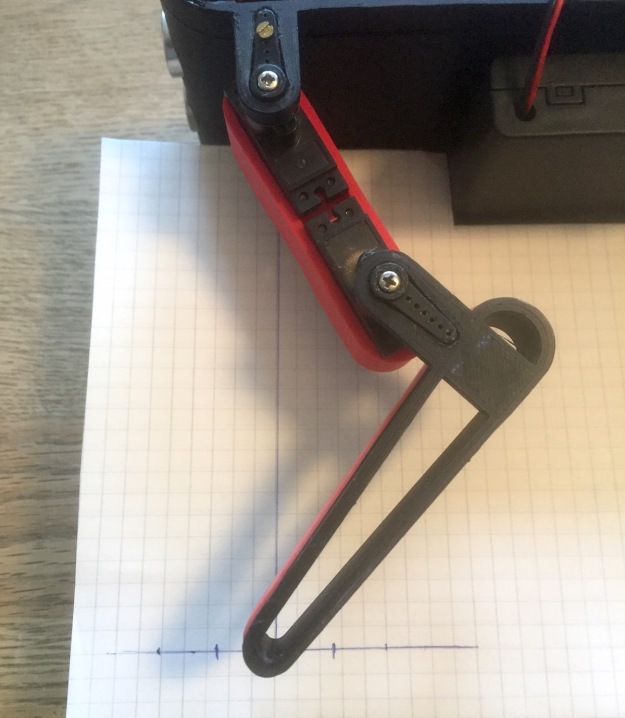
To increase precision get a sheet of graph paper, glue it to some cardboard to add stiffness. Place it between Felix legs like this:
Now copy/write your calibration offset to the index.js file
var config = {
  granularity:3,
  speed:40,
  geometry:{ femur:44, tibia:74, height:110,
             step_height:10, step_width:26 },
  gait: [ //expected order FR, FL, BR, BL
          [1,2,3,4],
          [2,3,4,1],
          [3,4,1,2],
          [4,1,2,3]
        ],
  legs:[  //expected order FR, FL, BR, BL
                      {
                         id:'FR',
                         label:'Front right',
                         origin:{x:10,y:0},
                         hip:{ pin:0, offset:2, invert:false },
                         knee:{ pin:1, offset:4, invert:false }
                      },
                      {
                         id:'FL',
                         label:'Front left',
                         origin:{x:15,y:0},
                         hip:{ pin:2, offset:3, invert:true },
                         knee:{ pin:3, offset:-4, invert:true }
                      },
                      {
                         id:'BR',
                         label:'Back right',
                         origin:{x:10,y:0},
                         hip:{ pin:4, offset:-2, invert:true },
                         knee:{ pin:5, offset:-6, invert:true }
                      },
                      {
                         id:'BL',
                         origin:{x:0,y:0},
                         label:'Back left',
                         hip:{ pin:6, offset:-3, invert:false },
                         knee:{ pin:7, offset:-4, invert:false }
                      }
                   ]
              };
Run the index.js file. A reference to felix is injected to the REPL.
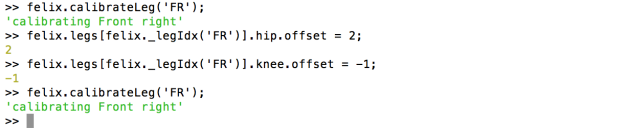
From the REPL you can call:

Update the values directly in the REPL and recalibrate until you get it right:
Now, control the home position of the leg:

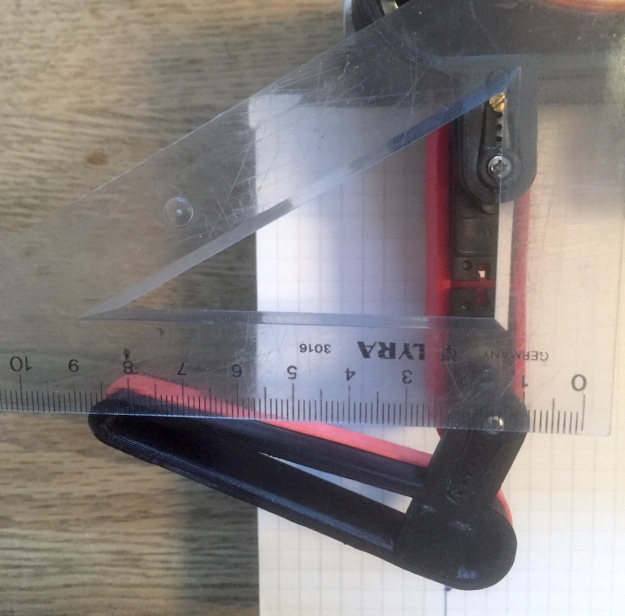
Use the graph to check that the tip of the leg hit it’s mark: directly 110 millimeter beneath the hip joint.
Next, control the two furthest points of the step:


If the home position and the step-pose position are off, you can tweak the leg’s origin values:

Once you are satisfied with your angles offsets and your origin offset, remember to update the values in the index file. Repeat this steps for the next tree legs.
Now let’s try some walking. Press the “arrow up” key and Felix will start a creeping gait by running the forward method. Press the space bar to pause and resume the walk.
Felix.prototype.forward = function(){
  if(this.state == 'forward_pause')
  {
    this._runSchedule();
    this.state = 'forward';
    return;
  }

  var c = this._genwalk();
  c.push({cmd:'loop',count:-1});
  this.schedule = c;
  this.cycle_idx = 0;
  this.scheduleIdx = 0;
  this._runSchedule();
  this.state = 'forward';
}
This method generates a walk cycle based on the current step properties, set the state and start running the scheduler.
The scheduler consumes an array of “frames”. The rate at which the frames are processed is controlled by the “speed” configuration value.
A frame consist of a command and a payload. Currently they are two types of frames, a control frame like:
{cmd:'loop',count:-1}
When the scheduler encounter this frame it loops back to the start of the scheduler and decrements the count value. If the count value reach zero the schedule continues with the next frame. For an infinite loop the count value can be set to -1.
The other type of frame is a “pose”:
{ cmd:'pose', angles:[{hip:int, knee:int}, {hip:int, knee:int},
{hip:int, knee:int}, {hip:int, knee:int} ] }
When the scheduler encounter this frame, it will position each leg joint to the provided angles.
The generated walk cycle is a creeping gait (or static stable gait) where the body is moved forward at the same time that the stepping leg is being lifted.
An alternative (more stable, but slower cycle) can be implemented by shifting the center of mass first and then lifting the stepping leg.
To generate the cycle, a step is divided into four key-poses. From pose one to four the legs push the ground behind shifting the body along. In pose four the leg is lifted in a semicircle back to pose one.
A gait is described as an array of poses:
//expected leg order FR, FL, BR, BL
gait: [
   [1,2,3,4],
   [2,3,4,1],
   [3,4,1,2],
   [4,1,2,3]
]
Felix currently master two creep gaits, the “cat” and the “deer”. In the cat gait the sequence of lifted legs is:
- front-right
- back-left
- front-left
- back-right
In the deer gait the sequence is:
- front-right
- back-right
- front-left
- back-left
From one pose to the next the needed transition points are generated by two methods: “_linearTrajectory” and “_ellipticalTrajectory”.
Felix.prototype._linearTrajectory = function(line,
                                             granularity,
                                             skip_start_point){
    var trajectory = [];
    var granularity = granularity || 8;

    //find the slope/delta
    var delta_x = line.b.x - line.a.x;
    var delta_y = line.b.y - line.a.y;

    //calculate the distance between the two points
    var distance = Math.sqrt( ((delta_x) * (delta_x)) +
                              ((delta_y) * (delta_y)) );

    if(distance == 0) return [];

    //divide the line int the required number of points
    //decrease the granularity one step to be able to include
    //the end point
    var skip = (skip_start_point)? 0:1;

    var step_size = distance / (granularity - skip);
    var c_step = (skip_start_point)? step_size:0;

    for(var i=0;i < granularity;i++){
        var inc = c_step / distance;

        trajectory.push({
                          x:Math.round(line.a.x +
                           (inc * delta_x)),
                          y:Math.round(line.a.y +
                            (inc * delta_y))
                        });
        c_step+= step_size;
     }
     return trajectory;
}

Felix.prototype._ellipticalTrajectory = function(arc,
                                                 granularity,
                                                 skip_start){
      var trajectory = [];
      granularity = granularity || 8;

      //divide the angles int the required number of points
      //decrease the granularity one step to be able to include
      //the end point
      var skip = (skip_start)? 0:1;
      var step_size = (arc.end_angle - arc.start_angle) /
                      (granularity - skip);
      var c_angle = arc.start_angle;

      if(skip_start_point) c_angle+= step_size;

      for(var i=0;i < granularity;i++){
        var x = arc.origin.x + arc.radius.x *
                Math.cos(Math.radians(c_angle));

        var y = arc.origin.y + arc.radius.y *
                Math.sin(Math.radians(c_angle));

        trajectory.push({ x:Math.round(x),y:Math.round(y) });
        c_angle+= step_size;
      }
      return trajectory;
}
The number of transition points in both methods are governed by the configuration variable “granularity”.
The points generated for the poses and transitions are then converted to angles using the Inverse kinematics method described in a previous post. This angles are added to the frame, and the frame is added to the scheduler.
This is a video of the cat style creep gait:
And the “deer” style creep gait:
